The Community forums are being phased out in favor of a new Slack group.
Add your email address below to get an invitation to join the community slack group
Create an Invoicing system with FP
Formidable Pro Invoicing System
Here’s a guide on how to use Formidable Pro to create an invoicing system that allows you to create itemised invoices, assign them to your clients and keep track of payments made.
What you’ll need:
- Formidable Pro (some pro fields & views are required)
Optional Extras:
- Print-O-Matic Plugin - Allows your customers to print / download the invoices.
- A client management plugin - I use WP-Client to give me extra options but this isn’t required.
- Formidable Payment Add-on - All of my customers pay via bank transfer or cheque but you could easily use any of the payment add-ons like PayPal to collect payments online.
The Set-Up
Before you begin you’ll need to do a little set up by creating a couple of forms which will be for Admin use only. These are:
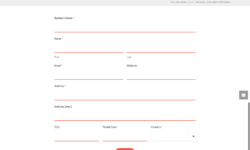
- Add a new customer form - This form is for adding your customers name & address information. I used the standard template ‘User Information’ form that comes with FP and added a ‘Business Name’ field.
NOTE: You will need to have a field in your form that you can use to assign your invoices to a customer. I have a field in my users profile called ‘Client Business Name’ and i make sure that the ‘Business name’ field in my form matches this entry exactly. You could use a standard field though like ‘display name’ or ‘nickname’ to the same thing.
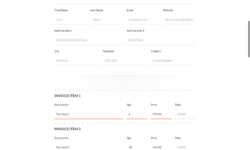
- Add a new invoice form - This form will be used to create your invoices. It will need to contain everything you want to show up on your invoice that’s customer specific. Attached is a screenshot of my form which contains the following fields:
- Invoice Status: PAID or UNPAID
- Invoice Number - this is just a basic text field with the ‘increment’ default value [auto_id start=1]
- Invoice Date & Payment Due Date - The invoice date uses the [date] default value and the Payment Due Date uses an additional snippet to automatically set the 2nd date at +30 days. You can read more about it HERE
- Total - This is a text field which auto calculates it’s value from the itemised lines.
- Customer Details - The customer details section uses lookup fields from the ‘Add a new customer’ form so that you only need to select the customer name from the dropdown, and the rest of the fields auto-populate. You can read more about how to do this HERE
- Itemised lists - I then have 5 ‘section’ fields which each contain the same 4 fields: Item description, Qty, cost & total. The total field is a calculation using the Qty & Cost fields. You can obviously have more than 5 so just add as appropriate.
That’s all that’s required for the new invoice form but if you could add other fields to it. One option to expand the functionality further is to have the itemised items as lookup fields that you can select from a pre-set list. Descriptions and item costs could all be stored in a DB and looked up to make things easier & faster.
Once you have the 2 forms completed you’ll need to create a view to display the invoice list and the invoices. It’s also a good idea to add an entry to each one of the forms so that you can test that everything is working.
The View
You will then need to create a view to display your invoices. The view settings will be set as follows:
Basic Settings:
- Use entries from form: Add a new invoice
- View Format: Both (Dynamic)
Advanced Settings > Sort & Filter:
- Order: Invoice Date / Descending
- Filter Entries: Customer > Is equal to > [wpc_client_business_name] - This filter is important as it's how the correct invoices will be shown to the right customer. The field 'Customer' should contain the exact same information as this field will look up. As i mentioned above i use a field in each customer profile called [wpc_client_business_name] but you could use the [display_name] short code instead.
- No entries Message: ‘No Invoices Found'
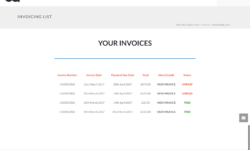
Listing Page
This just uses a simple HTML table to display some of the info from the form entry and the [detail_link] required to view each entry (invoice).
My code for this section is below and the resulting screenshot is attached:
Before content:
<table>
<tr>
<td><strong>Invoice Number</strong></td>
<td><strong>Invoice Date</strong></td>
<td><strong>Payment Due Date</strong></td>
<td><strong>Total</strong></td>
<td><strong>More Details</strong></td>
<td><strong>Status</strong></td>
</tr>
Content:
<tr>
<td>CADS0000[115]</td>
<td>[116]</td>
<td>[126]</td>
<td>£[129]</td>
<td><a href="[detaillink]">VIEW INVOICE</a></td>
<td>[if 167 equals="UNPAID"]<strong>[167]</strong>[/if 167][if 167 equals="PAID"]<strong><span style="color:green;">[167]</span></strong>[/if 167]</td>
</tr>
After content:
</table>
Details Page
The details page is a little complicated as it uses some HTML tables and other short codes specific to my theme and a few div elements to style things how i wanted it but you can play with this to get it right for you.
There’s a great article in the Formidable documentation about how to update a field in your form from within the view. I used this function to add a button to allow the client to mark the invoice as ‘Paid’ as i trust my clients to do this after they have done their bank transfer but you may want to leave it out.
You can read more about it here: https://formidableforms.com/knowledgebase/insert-a-link-to-change-the-value-of-a-single-field/
You can further expand this functionality and get the form to send you an email each time this is done by adding this snippet:
You can download the XML of my view to import and play around with which may help you get started.
Download here: https://www.dropbox.com/s/mn9l6lhvl1cer9t/cadsdigital.formidable.2017-03-20.xml?dl=0
There’s also a screenshot attached to show how it looks on the front end.
Other Information
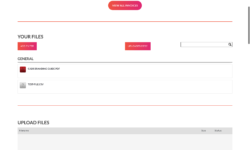
As i mentioned above i also use the Print-O-Matic plugin to add a ‘Print This Invoice’ button to the bottom of the invoice which makes it easy for the customer to either print the invoice or save it as a PDF. There are a number of other plugins that could be used to expand this functionality further but for me that was all that was required.
Here are the screenshots:
Hopefully this will help anyone who is thinking of using FP to create invoices for their customers and save you having to install another plugin.
Thanks
Chris
March 20, 2017 at 1:06 pm
Here are some more screenshots.
Attachments:

March 20, 2017 at 2:19 pm
Also, here are the links to some other useful files:
Email Notification: CLICK HERE
Dynamic View HTML: CLICK HERE
Dynamic View CSS: CLICK HERE
Enjoy
Chris
March 23, 2017 at 8:33 pm
Thank you, Chris, for your excellent post!
June 10, 2017 at 3:42 am
Thanks a lot for your excellent tuto
June 27, 2017 at 10:01 am
THANK YOU FOR THIS!!!! Real answer to prayer.
January 13, 2018 at 12:17 pm
Chris,
Thanks for the excellent post! This is great idea...
I've been passing all of my data from a view with parameters to the new form. User clicks on link, goes to new form. This works but I like the idea of the one page idea to create invoices.
However, I have one flaw I can't seem to work through. My users all maintain a user balance and I stored that as user-meta. I update that originally on the first registration form, then later on other payment forms. Is it possible to use a Lookup and Watch field to populate the user-meta?
Thanks!
January 14, 2018 at 3:08 pm
Hi dpenne
Glad you found the post useful.
Just so i understand you correctly, so you want to display the current user balance in the form and reduce the amount of the invoice from the current user balance?
If so that sounds like it should be achievable.
You can display the current user balance in the form (and invoice) using the [user_meta key=whatever] if the information is stored in the user-meta table or use a Lookup field as you mentioned.
You could then have a hidden field that does a basic calculation like [current_balance]-[invoice_total] and that will give you either:
a) the remaining balance or
b) a negative value if the invoice total is more than the balance.
You can then use that field to calculate if the customers needs to pay anything or not.
To update the value of the balance after the form has been submitted i would probably use the frm_after_create_entry hook. You could use THIS article which i wrote a few weeks ago which is a variation on the article HERE.
Hope that helps.
Chris
January 14, 2018 at 3:41 pm
Thanks Chris!
I know I can’t display user meta like that. The problem is showing another user. The admin prints the invoice. So I want them to select a user and then populate that user meta. Admin logs in, selects user, and that populates the clients/balance.
January 14, 2018 at 11:15 pm
Hi dpenne
Ahh yes you're right. So in that case there's already a Lookup field in the form that you can utilise and you could add a new watch field for the balance.
I haven't tried it out but it certainly seems possible.
I'll give it a try and see if any other issues come up.
Chris
March 14, 2019 at 4:16 am
Hi Ryan,
It depends how you're receiving the payment.
Most of our customer pay via bank transfer so it's easier for us to update it manually but if you're using the Stripe or PayPal add-on then it would be quite straight forward to update the entry after a payment has been made.
Hope that helps.
Chris
Discussion closed.